

1 day ago
Showing posts with label photo. Show all posts
Showing posts with label photo. Show all posts
Thursday, January 8, 2009
Paradigm (Tilt) Shift
Ever heard of tilt-shift photography? By carefully manipulating a camera with special (often expensive) lenses, it's possible to produce a photograph of a life-sized location or subject that looks remarkably like a miniature-scale model. The results of the technique are engrossing and are useful for creating compelling images. Thanks to the TiltShiftMaker site, students can generate their own tilt-shift pictures without spending a dime!
Friday, November 28, 2008
The Peferct Storm
Check this out: Need just the right picture to convey a concept? Chances are that you'll turn to Flickr to see what you can find. If so, consider using FlickrStorm. It's a nifty, quick way to search for Flickr images.

Wednesday, November 19, 2008
Life is Good
Here's a useful resource that can be used to make learning in your classroom more engaging. Consider supplementing your instruction with a veritable cornucopia of striking images. Thanks to a joint project from Google and LIFE magazine, media specialists, teachers, students--heck, anyone--can easily search through millions of photographs from the LIFE magazine photography archive. This treasure trove of images spans from the 1700s up until today. Most of the images have never been published and are just now being viewed for the very first time.
 .
.
.
Tuesday, July 8, 2008
Want to Be Noticed? Be Funky
A big part of teaching students is merely capturing their interest. If the classroom is an engaging place, learning is more likely to occur. Good educators are always on the lookout for new means of getting and keeping attention. In addition to ensuring that content is relevant to pupils, teachers can and ought to occasionally inject a little novelty into the slide shows used in their activities and lessons.
One, simple way to do this is to use stylized images rather than photographs. Not only will this usually garner a few, concentrated stares, displaying artsy renderings of normally photographs images is an effective digital skill that students can learn and master. A great, free resource for transforming photographs into cartoonized art is BeFunky. It's easy to use.
First, drop by BeFunky. The site looks like this:
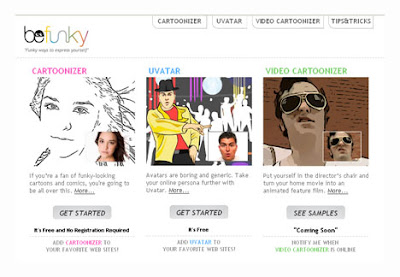 Look at the Cartoonizer portion of the page.
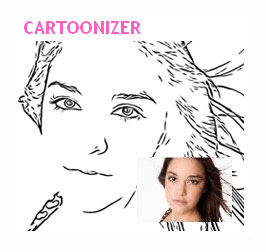 Click on the GET STARTED button.

Upload an image from your computer (click on the FROM YOUR DESKTOP icon).
 If you've successfully chosen an image, you'll see something like this in a moment or two.
 After that, your uploaded file will be waiting for you. For example, here's what I uploaded...
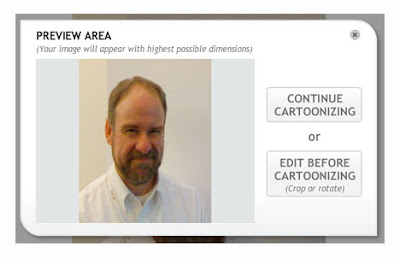 Click on the CONTINUE CARTOONIZING button.
 To generate a pencil-like drawing, click on the SKETCH tab.
 Choose your level of SKETCH DETAIL. Try MEDIUM to begin with. Don't worry about being "stuck" because you can always click RESTORE if you don't like the results.
 Click APPLY.
 Before you know it, you'll have a sketched/cartoonized image ready for use. Here's a "sketched" picture of me.
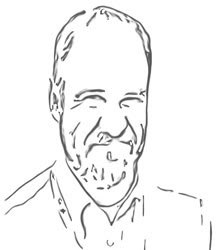
That's all there is to it! Why not experiment using this nifty tool. With a little practice, pupils will have no trouble using this site to spice up their own digital documents. This resource is especially promising in that pupils who want to use an iconic, copyrighted image have a means of generating the next best thing: a cartoonized version of a picture they might not otherwise be allowed to display. More importantly, BeFunky gives students a tool for creating. Learners who tinker with this resource are more likely to communicate ideas in a more compelling manner. What are you waiting for? Be funky!
One, simple way to do this is to use stylized images rather than photographs. Not only will this usually garner a few, concentrated stares, displaying artsy renderings of normally photographs images is an effective digital skill that students can learn and master. A great, free resource for transforming photographs into cartoonized art is BeFunky. It's easy to use.
First, drop by BeFunky. The site looks like this:
 Look at the Cartoonizer portion of the page.
 Click on the GET STARTED button.
Upload an image from your computer (click on the FROM YOUR DESKTOP icon).
 If you've successfully chosen an image, you'll see something like this in a moment or two.
 After that, your uploaded file will be waiting for you. For example, here's what I uploaded...
 Click on the CONTINUE CARTOONIZING button.
 To generate a pencil-like drawing, click on the SKETCH tab.
 Choose your level of SKETCH DETAIL. Try MEDIUM to begin with. Don't worry about being "stuck" because you can always click RESTORE if you don't like the results.
 Click APPLY.
 Before you know it, you'll have a sketched/cartoonized image ready for use. Here's a "sketched" picture of me.
That's all there is to it! Why not experiment using this nifty tool. With a little practice, pupils will have no trouble using this site to spice up their own digital documents. This resource is especially promising in that pupils who want to use an iconic, copyrighted image have a means of generating the next best thing: a cartoonized version of a picture they might not otherwise be allowed to display. More importantly, BeFunky gives students a tool for creating. Learners who tinker with this resource are more likely to communicate ideas in a more compelling manner. What are you waiting for? Be funky!
Monday, July 7, 2008
Free, Lively Images via Morguefile
When teachers ask me where they can get free image reference resources for various multimedia projects, I steer them to MorgueFile. It's a site that contains digital imagery that has been supplied by numerous photographers and artists around the world. What makes MorgueFile so appealing is that the images that reside there are high resolution and copyright free!

Friday, July 4, 2008
NECC Aftermath: Fun with Photos on the 4th
It's 4th of July and I'm celebrating Independence Day in San Antonio, Texas. Since I'm officially off the clock and free to do as I please (I go back to my other, supposedly real job on Monday), I've decided to walk about the town and snap a few photographs. Although I'm not a professional photographer, I also know that digital cameras make it pretty easy for anyone to take a picture. This is true for educators and pupils, as well. I'm hoping that all of the teachers and students that I know will make an effort to integrate digital photography into their classroom practices. Toward that end, I'm going to practice what I preach. I'm going to collect digital images and make them available to those I teach. Doing so gives me an opportunity to demystify the process of capturing images, processing them, and uploading the results to an online account.
Any teacher or media specialist who is contemplating the purchase of a digital camera should construct a camera kit. Doing so is an investment in the efficient practice of digital photography. In order to be at the top of my game when photographing, I've assembled such a kit to help me do my work. My particular camera uses a rechargeable battery. That's a good thing because the flash feature on my camera can drain power from my battery in no time. I also have a battery charger and a spare battery. Initially, I was hesitant to purchase the charger and battery but have since come to appreciate my decision. I always make sure that both batteries are charged and carry them with me. When one eventually dies, I'm able to swap it out for the juiced up counterpart. In addition to the batteries and charger, I have spare SD cards. Nothing's more frustrating (aside from dead batteries) than a camera that can't take pictures because its memory card is full. Pack a spare.
With camera in hand, I'm going out to snap a few pictures.
Time passes.
Okay, I'm back. I've ambled around the Alamo, hustled down Houston Street, meandered about the Menger Hotel, rambled along the River Walk, lollygagged along La Villita, and milled about the Market. During that time, I've snapped pictures here, there, and virtually everywhere. Now, I'm ready to remove the images from my camera and upload them to the internet where I can share them.
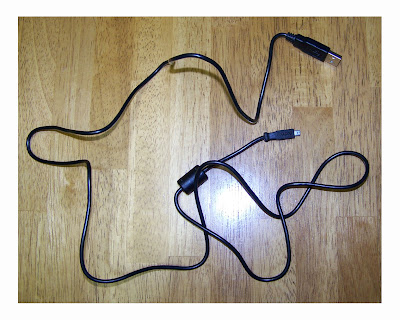
I know that I'll be connecting my digital camera to my PC so, I round up the appropriate cable and get to work. Not all USB cables are equal. I know better than to plug any old USB cable into my digital camera. I could damage the camera. I make a point of keeping all of the cables that came with my camera close at hand.
 After finding the appropriate cable, I locate the AV-Out port on my digital camera.
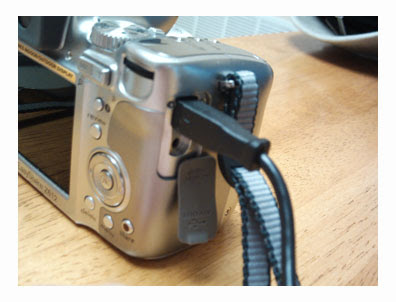
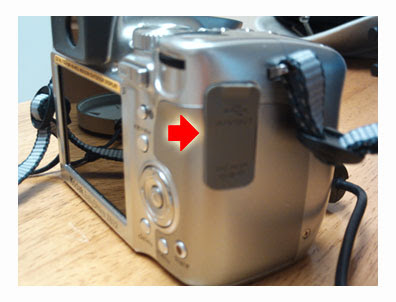 Next, I carefully open the AV-OUT cover to reveal the port where I'll be connecting the USB cable.
 I plug the USB cable into the appropriate port.
 Next, I locate one of the USB ports on my computer.
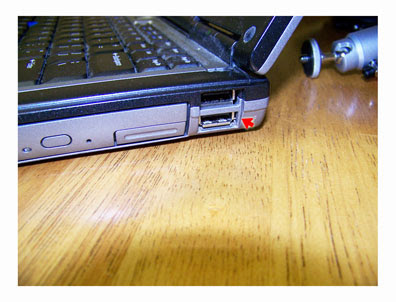 I plug the USB cable into my PC.
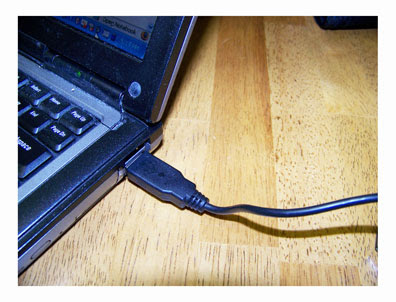 Now that everything is connected, I turn on my digital camera. Within a few moments, my computer pops up a dialogue box to let me know that the PC is aware that a camera has been linked with it. At this point, it's waiting for me to select the manner in which I intend to transfer my pictures.
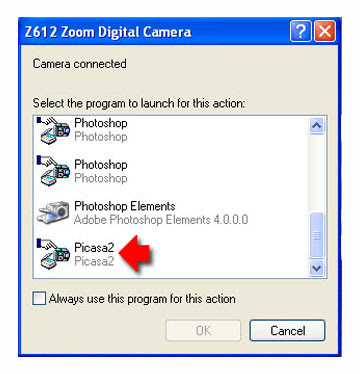
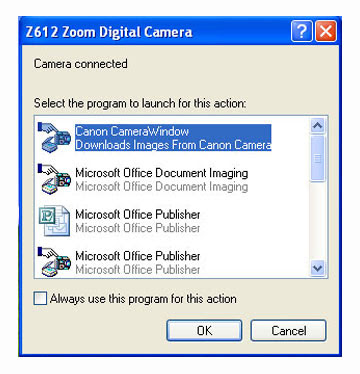 After scrolling down through a list of applications, I choose Google's ever helpful and free photo-editing software, Picasa. Anyone who has a GMail account automatically has a Picasaweb account.In my opinion, Picasa is one of the simplest way to transfer images from a camera to my PC.
 In a matter of seconds, Picasa cranks up and starts loading the images from my digital camera.
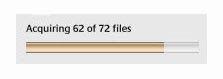
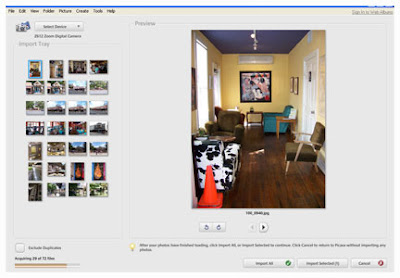 As the images being loaded into the program, Picasa tells me how many pictures are being acquired.
 After all of the images have loaded, I decide to IMPORT ALL of them onto my PC.
 The following dialogue box appears.
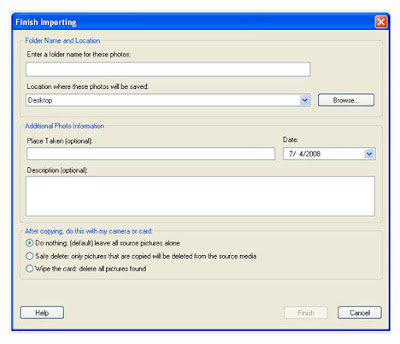 At this point I have to make a choice. I have to decide whether to delete the images from my camera or leave them there until another time. I know that if I'm unsure or frightened that I'll accidentally destroy them, I can always choose to do nothing (in fact, I do nothing a great deal of the time).
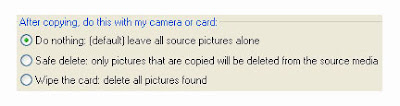 However, I've done this kind of thing before so I decide to wipe the card and remove the images from my camera. I also supply information in the dialogue box.
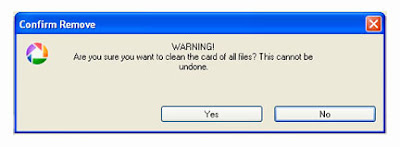
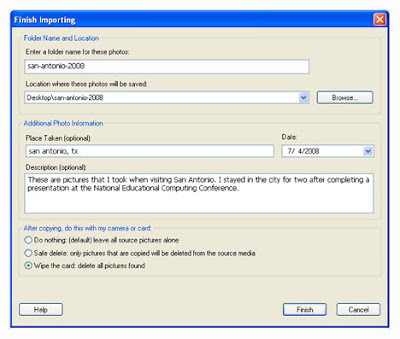 Since I've decided to wipe the card of images, I get a warning from Picasa asking me if I really want to deleting the pictures from my camera. I know I do so I choose YES.
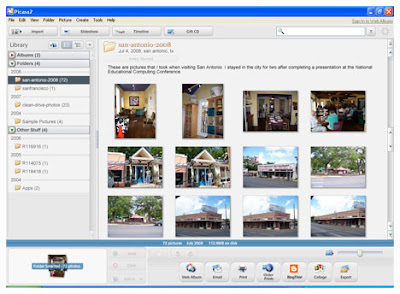
 Picasa is now populated with my recently captured pictures. I can begin editing them. I decide to double click on the very first image in the collection. I snapped the image while visiting the MadHatters, one of my favorite San Antonio eateries. If you're in town, drop by the historic King William District and check out this excellent culinary experience. MadHatters makes a tasty brunch and serves it with delightfully daffy style. I highly recommend the Dean Scram.
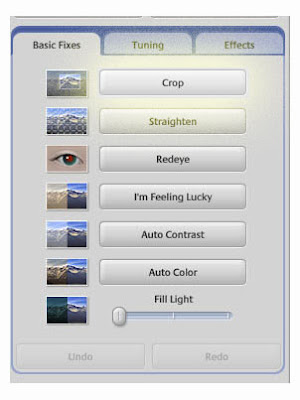
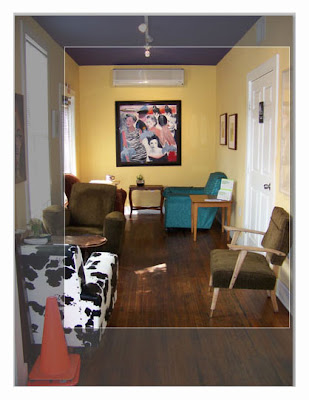
 Back to photo editing. Since, I've singled out this particular image for editing, Picasa brings it to the forefront. I glance over at the tools on the left-hand side of the screen. Hmmm, that oddly placed orange cone detracts from the image so I decide to crop it out of the photograph.
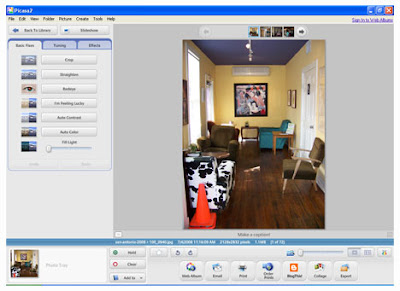 I click on the CROP button. Doing so will allow me to trim the photo enabling me to select only the part of the image I want to see.
 I'm able to select the part of the image I want others to see. Ah, yes, the orange cone is outside the boundaries of my cropped image now.
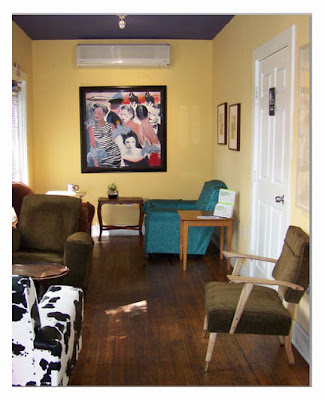
 I decide I like the cropping and APPLY the changes by clicking on the appropriate button.
 With the cone removed, the picture looks much more appealing. However, it's kind of dark. I decide to make it a little brighter.
 To brighten the image, I click on TUNING tab. I'm in luck because I can use these sliders to tinker with level of brightness in the photograph. I adjust the FILL LIGHT and COLOR TEMPERATURE.
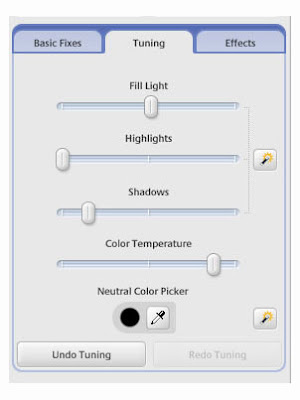 By the way, the EFFECTS tab allows users to do all kinds of amazing things to photos--more, I'm afraid, than I can explore here. The best way to learn about the effects is to play with Picasa. The only thing Picasa doesn't do is allow me to layer images. That's a Photoshop or GIMP kind of feature. Photoshop is expensive but GIMP is free. I'll explore the wonders of GIMP and layering in another post.
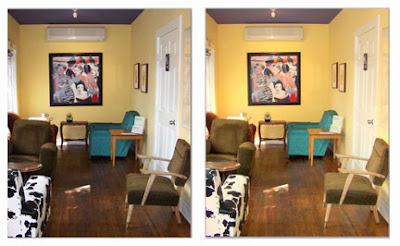
The results of my photoediting are pleasing to my eye. Compared to the original version of the image, the final photo is, in my opinion, more appealing.
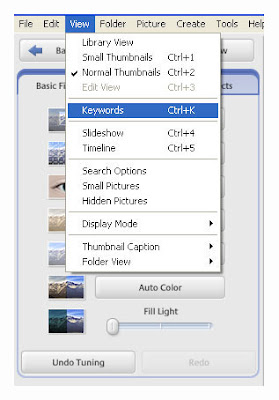
 In order to make this image easier to find in the future, I decide to tag it with a few terms. I go up to VIEW, scroll down and choose KEYWORDS.
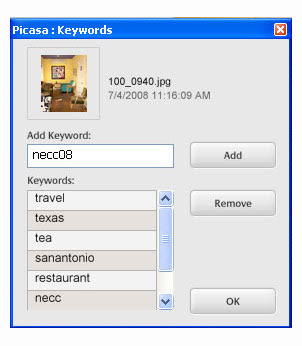
 I add all of the words I can think of that describe the image.
 The thought occurs to me that I'd like to associate this image with the location where I snapped the photo. I know that Picasa will allow me to geotag my images. I go up to TOOLS, scroll down to GEOTAG, and choose GEOTAG WITH GOOGLE EARTH.
 In a few moments, Google Earth opens and I type the street address where I snapped the photograph. I've successfully geotagged my image.
 At this point, I decide to tweak the rest of my images. That is, I crop or tinker with the amount of brightness, warmth, or saturation of each photograph. When I've finished, I press CTRL A to select all of the images withing Picasa. I know they've been selected because each image has a blue band around it and a number of thumbnail images in my photo tray depict the amount of photos I've chosen to work with at this time.
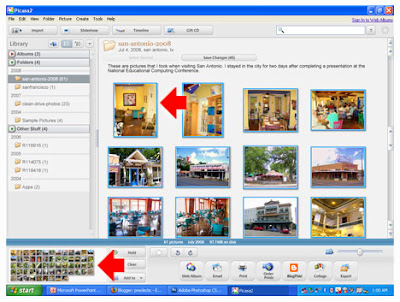 I click the HOLD button to make sure that none of images is accidentally de-selected.
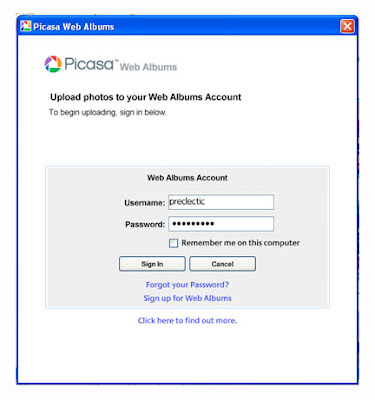
 Now, I can upload the photographs to my Picasaweb account. Since I have a GMail account, I know that I have access to Picasaweb. I click the WEB ALBUM button.
 I see the following dialog box. I supply my username and password.
 At this point in the process, I have to decide whether or not to make my images viewable by any and everyone or keep them private.
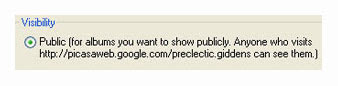
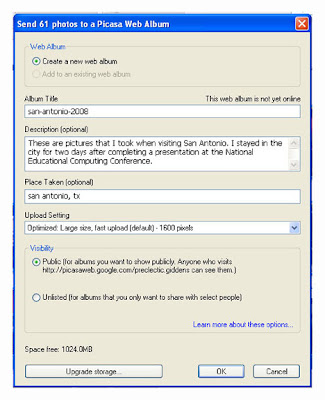 Since I know better than to store any potentially embarrassing images on the internet (good rule of thumb: never post anything you wouldn't feel comfortable sharing on a billboard), I decide to make my images PUBLIC. Picasa even tells me the address of the album. It's http://picasaweb.google.com/preclectic.giddens
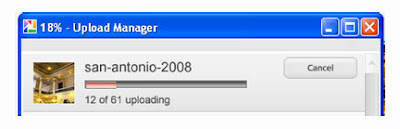
 It takes a little while for the images to upload. Picasa gives me a running update of the process with a little status box.
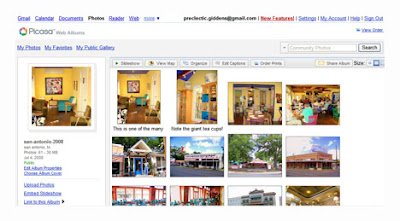
 When the process comes to an end, I can view the online album. As the owner of the album, I have permission to make changes to the images. Anyone who visits the album will only be able to view the pictures. I don't need to worry about any of my photographs being deleted.
 Okay, faithful readers, try it yourself!
Related links:
Any teacher or media specialist who is contemplating the purchase of a digital camera should construct a camera kit. Doing so is an investment in the efficient practice of digital photography. In order to be at the top of my game when photographing, I've assembled such a kit to help me do my work. My particular camera uses a rechargeable battery. That's a good thing because the flash feature on my camera can drain power from my battery in no time. I also have a battery charger and a spare battery. Initially, I was hesitant to purchase the charger and battery but have since come to appreciate my decision. I always make sure that both batteries are charged and carry them with me. When one eventually dies, I'm able to swap it out for the juiced up counterpart. In addition to the batteries and charger, I have spare SD cards. Nothing's more frustrating (aside from dead batteries) than a camera that can't take pictures because its memory card is full. Pack a spare.
With camera in hand, I'm going out to snap a few pictures.
Time passes.
Okay, I'm back. I've ambled around the Alamo, hustled down Houston Street, meandered about the Menger Hotel, rambled along the River Walk, lollygagged along La Villita, and milled about the Market. During that time, I've snapped pictures here, there, and virtually everywhere. Now, I'm ready to remove the images from my camera and upload them to the internet where I can share them.
I know that I'll be connecting my digital camera to my PC so, I round up the appropriate cable and get to work. Not all USB cables are equal. I know better than to plug any old USB cable into my digital camera. I could damage the camera. I make a point of keeping all of the cables that came with my camera close at hand.
 After finding the appropriate cable, I locate the AV-Out port on my digital camera.
 Next, I carefully open the AV-OUT cover to reveal the port where I'll be connecting the USB cable.
 I plug the USB cable into the appropriate port.
 Next, I locate one of the USB ports on my computer.
 I plug the USB cable into my PC.
 Now that everything is connected, I turn on my digital camera. Within a few moments, my computer pops up a dialogue box to let me know that the PC is aware that a camera has been linked with it. At this point, it's waiting for me to select the manner in which I intend to transfer my pictures.
 After scrolling down through a list of applications, I choose Google's ever helpful and free photo-editing software, Picasa. Anyone who has a GMail account automatically has a Picasaweb account.In my opinion, Picasa is one of the simplest way to transfer images from a camera to my PC.
 In a matter of seconds, Picasa cranks up and starts loading the images from my digital camera.
 As the images being loaded into the program, Picasa tells me how many pictures are being acquired.
 After all of the images have loaded, I decide to IMPORT ALL of them onto my PC.
 The following dialogue box appears.
 At this point I have to make a choice. I have to decide whether to delete the images from my camera or leave them there until another time. I know that if I'm unsure or frightened that I'll accidentally destroy them, I can always choose to do nothing (in fact, I do nothing a great deal of the time).
 However, I've done this kind of thing before so I decide to wipe the card and remove the images from my camera. I also supply information in the dialogue box.
 Since I've decided to wipe the card of images, I get a warning from Picasa asking me if I really want to deleting the pictures from my camera. I know I do so I choose YES.
 Picasa is now populated with my recently captured pictures. I can begin editing them. I decide to double click on the very first image in the collection. I snapped the image while visiting the MadHatters, one of my favorite San Antonio eateries. If you're in town, drop by the historic King William District and check out this excellent culinary experience. MadHatters makes a tasty brunch and serves it with delightfully daffy style. I highly recommend the Dean Scram.
 Back to photo editing. Since, I've singled out this particular image for editing, Picasa brings it to the forefront. I glance over at the tools on the left-hand side of the screen. Hmmm, that oddly placed orange cone detracts from the image so I decide to crop it out of the photograph.
 I click on the CROP button. Doing so will allow me to trim the photo enabling me to select only the part of the image I want to see.
 I'm able to select the part of the image I want others to see. Ah, yes, the orange cone is outside the boundaries of my cropped image now.
 I decide I like the cropping and APPLY the changes by clicking on the appropriate button.
 With the cone removed, the picture looks much more appealing. However, it's kind of dark. I decide to make it a little brighter.
 To brighten the image, I click on TUNING tab. I'm in luck because I can use these sliders to tinker with level of brightness in the photograph. I adjust the FILL LIGHT and COLOR TEMPERATURE.
 By the way, the EFFECTS tab allows users to do all kinds of amazing things to photos--more, I'm afraid, than I can explore here. The best way to learn about the effects is to play with Picasa. The only thing Picasa doesn't do is allow me to layer images. That's a Photoshop or GIMP kind of feature. Photoshop is expensive but GIMP is free. I'll explore the wonders of GIMP and layering in another post.
The results of my photoediting are pleasing to my eye. Compared to the original version of the image, the final photo is, in my opinion, more appealing.
 In order to make this image easier to find in the future, I decide to tag it with a few terms. I go up to VIEW, scroll down and choose KEYWORDS.
 I add all of the words I can think of that describe the image.
 The thought occurs to me that I'd like to associate this image with the location where I snapped the photo. I know that Picasa will allow me to geotag my images. I go up to TOOLS, scroll down to GEOTAG, and choose GEOTAG WITH GOOGLE EARTH.
 In a few moments, Google Earth opens and I type the street address where I snapped the photograph. I've successfully geotagged my image.
 At this point, I decide to tweak the rest of my images. That is, I crop or tinker with the amount of brightness, warmth, or saturation of each photograph. When I've finished, I press CTRL A to select all of the images withing Picasa. I know they've been selected because each image has a blue band around it and a number of thumbnail images in my photo tray depict the amount of photos I've chosen to work with at this time.
 I click the HOLD button to make sure that none of images is accidentally de-selected.
 Now, I can upload the photographs to my Picasaweb account. Since I have a GMail account, I know that I have access to Picasaweb. I click the WEB ALBUM button.
 I see the following dialog box. I supply my username and password.
 At this point in the process, I have to decide whether or not to make my images viewable by any and everyone or keep them private.
 Since I know better than to store any potentially embarrassing images on the internet (good rule of thumb: never post anything you wouldn't feel comfortable sharing on a billboard), I decide to make my images PUBLIC. Picasa even tells me the address of the album. It's http://picasaweb.google.com/preclectic.giddens
 It takes a little while for the images to upload. Picasa gives me a running update of the process with a little status box.
 When the process comes to an end, I can view the online album. As the owner of the album, I have permission to make changes to the images. Anyone who visits the album will only be able to view the pictures. I don't need to worry about any of my photographs being deleted.
 Okay, faithful readers, try it yourself!
Related links:
- Here are my San Antonio photos.
- If you're intrigued with Photoshop but want to try out a free version, check out Photoshop Express.
Subscribe to:
Comments (Atom)

